To ensure your prints look their best, we recommend submitting high-resolution, print-ready PDF files. This format helps us process your order quickly and efficiently. We can also accept TIFF or high-resolution JPG files. Please note, additional charges may apply for converting other file formats to ensure they meet our print standards.
When preparing your files for printing, it's important to handle compression carefully to maintain quality. Compression reduces file size by eliminating redundant data, but it can also lower the quality of your images. To ensure your print looks sharp and clear:
• Set compression to "None" or "Do Not Downsample" to preserve the original quality. • Avoid options that reduce resolution. For printing, always keep your image resolution at a minimum of 300dpi to ensure high-quality output.
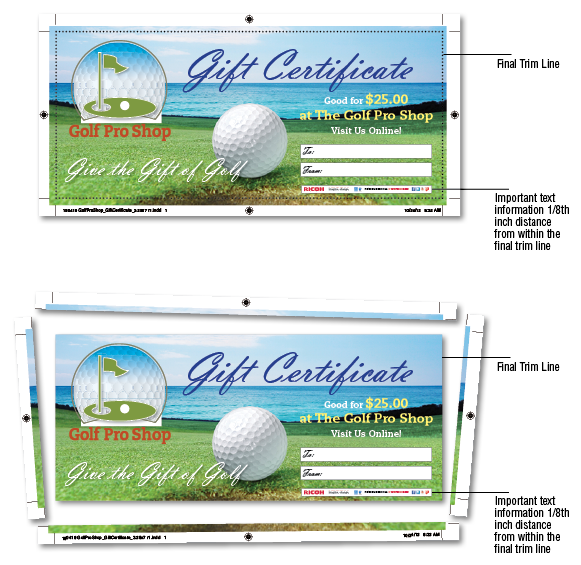
Bleed: To ensure your print covers the entire surface without any white edges, extend your design past the cut line by 1/8 inch. This extra margin is what we call "bleed," and it's essential for anything that needs edge-to-edge printing, like photos or background colors.
Safe Area: Keep all crucial elements like text and logos within the safe area, at least 1/8 inch away from the edge of your design. This helps prevent important details from being cut off during the trimming process.
Borders: If your design includes borders, make sure they are at least 1/8 inch inside the trim line to avoid uneven edges due to slight shifts in cutting.
Not all design programs automatically include bleed settings. For example, if using Photoshop, you'll need to manually extend your design by 1/4 inch on all sides beyond your final size to ensure it includes a bleed.
Always check our downloadable templates for guidance on setting up your files correctly, ensuring your finished product looks exactly as intended.
When setting up your document, include a 1/8” (0.125”) bleed to ensure a seamless edge. Ensure these settings are reflected when you generate your PDF to include bleed.
For the best results in your printed materials, it's crucial to manage color settings correctly. When setting up your files:
• Opt for "No Conversion," "Leave As Is," or "Composite" to ensure your colors remain true to your original design. • This approach prevents any unwanted changes to your color scheme, keeping your visuals consistent and as intended.
To get the clearest, most detailed print results, always use high-resolution images. A high pixel density—ideally 300 dots per inch (dpi)—ensures your photos capture every detail and shade, from vivid backgrounds to subtle hues. Web images are often at 72dpi, which might look good on your screen but can appear blurry or pixelated when printed.
For the best results:
• Never lower the resolution of your images.
• Use the highest quality camera settings for photography.
• Opt for vector graphics, especially for precise items like envelope artwork, to ensure sharp and crisp reproduction.
Remember, the right image quality can make a significant difference in how your final print product looks. If you're unsure about your images, we’re here to help you evaluate and enhance them for the best print outcome.
Before sending us your artwork, please convert all files to CMYK color mode. This step is crucial for preserving the integrity of your colors in print. Most graphic design software provides instructions for this conversion. After switching to CMYK, take a moment to review your artwork. Ensure that reds and greens remain vibrant, blues haven’t shifted to purple, and yellows retain their brightness. This extra check helps guarantee that the colors in your final printed piece look exactly as you intended.
Proofs and File Check
Print As-Is
Choose this for the fastest turnaround. Your project goes directly into production when you confirm your order.
Soft Proof (PDF File) – Free
We'll email you a PDF proof or a link to view it online. This is ideal for checking layout and content, but keep in mind that exact color accuracy can't be guaranteed due to differences in monitor settings.
First Order Hard Proof – Free
As a welcome to new customers, we offer a hard proof if you have any concerns about how your printed product will appear.
Hard Proof (digitally printed, no finishing)
We'll send you a printed proof without any finishing. This is suitable for products like postcards where finishing isn't critical.
Hard Proof (digitally printed, with finishing)
This proof includes finishing and is recommended for booklets and folded products to ensure everything looks perfect.
File Check - No Charge
If something seems off with your file, our team will reach out to discuss potential fixes. There’s no cost for this check, but it doesn’t apply if you choose the 'Print As-Is' option. Changes requested after file approval may incur additional charges.